Are you searching for way to take your nail game to the next level? You're in the right place! Our comprehensive acrylic nail tutorial is here to guide you through each step of the process, whether you're a nail art newbie or a seasoned pro. With our easy-to-follow instructions and top-quality products, you'll be creating stunning acrylic designs in no time.
Acrylic nails are amazing! They make your nails look super pretty and colorful. You can choose from so many cool designs and sparkly things to put on them. Acrylic nails last a long time, so you can enjoy them for weeks without worrying about them getting messed up. They also protect your real nails and make them stronger. Acrylic nails can make you feel confident and happy. They're like a little work of art on your fingertips. So if you want nails that look awesome and stay looking awesome, acrylic nails are the way to go.
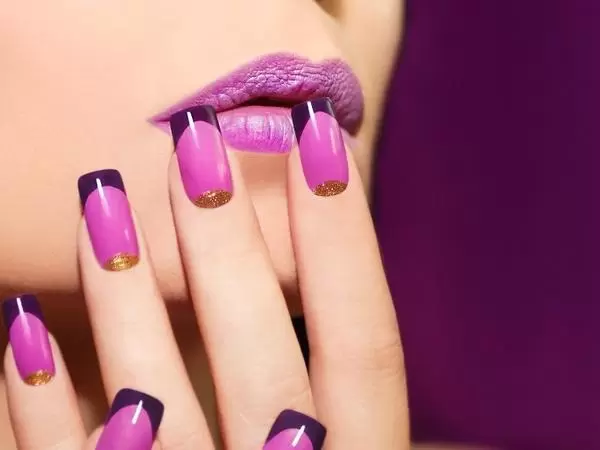
Acrylic Nail Tutorial: Tips and Tricks for a Professional Finish
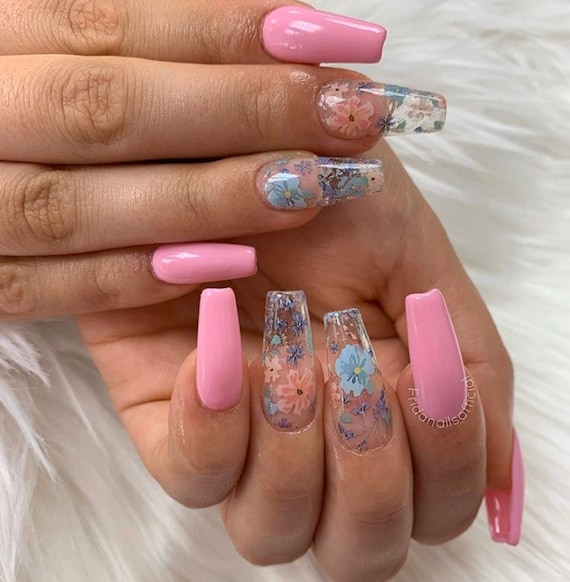
Image Source: google.com
Are you ready to take your acrylic nails to the next level? Here are some simple tips and tricks to make your nails look professional and fabulous.
1. Prep is Key: Before applying acrylic, make sure to prep your nails properly. Clean them thoroughly, push back your cuticles, and shape your nails to your desired length. This will create a smooth and even base for your acrylic application.
2. Patience: Applying acrylic requires patience. Take your time when applying the mixture and shaping the nails. Working slowly and carefully will result in a neater and more professional-looking finish.
3. Use the Right Tools: Invest in quality brushes and nail files. Having the right tools will make a big difference in the application process. Use a fine brush for precision and a gentle nail file to smooth out any rough edges.
4. Thin Layers are Better: When applying acrylic, remember that thin layers are better than thick ones. Apply small beads of acrylic and spread them evenly over the nail surface. This will help prevent clumps and unevenness.
5. Smooth: After the acrylic has cured, use a gentle nail buffer to smooth out any imperfections. Buffing will give your nails a polished and professional appearance.
6. Seal the Deal: Finish off your acrylic nails with a high-quality top coat. This will add shine, protect your nails, and make them look super glossy.
7. Practice Makes Perfect: Don't be discouraged if your first attempts don't turn out exactly as you hoped. Acrylic application takes practice, so keep trying and experimenting with different techniques. You'll improve with time and create amazing-looking nails!
Exploring the Benefits of Acrylic Nail Tutorials for Step By Step

Image Source: google.com
Have you ever wondered why so many people love best tutorial acrylic nails tutorial? Let's explore the awesome benefits of trying out acrylic nails.
1. Endless Creativity: Acrylic nails offer a world of creativity and self-expression. You can choose from a wide range of colors, glitters, and designs to match your style and mood. Whether you want bold and vibrant nails or something subtle and classy, acrylics have got you covered.
2. Long-Lasting Beauty: One of the great things about acrylic nails is their durability. They are known for their long-lasting nature, meaning you can enjoy beautiful nails for weeks without worrying about chipping or fading. This is perfect for special occasions, vacations, or simply to keep your nails looking stunning all the time.
3. Nail Protection: Acrylic nails provide an extra layer of protection for your natural nails. The acrylic coating acts as a shield, helping to prevent breakage and splitting. This can be especially beneficial if you have weak or brittle nails, as acrylics can provide added strength.
4. Instant Length and Shape: If you've always dreamt of having longer or differently shaped nails, acrylics can make it happen. With acrylic extensions, you can achieve the length and shape you desire, giving you that glamorous and polished look.
5. Confidence Boost: Having beautifully manicured nails can boost your confidence and make you feel fabulous. Acrylic nails can be a form of self-care and pampering, allowing you to showcase your style and personality. Plus, receiving compliments on your stunning nails can make you feel even more confident and happy.
Read More: 10 Reasons to Love Short Nail Designs in 2023
Remember, it's important to take care of your natural nails even when wearing acrylics. Follow proper maintenance routines and give your nails breaks between applications to keep them healthy.
A Beginner's Guide to Acrylic Nail Tutorials for Beginners
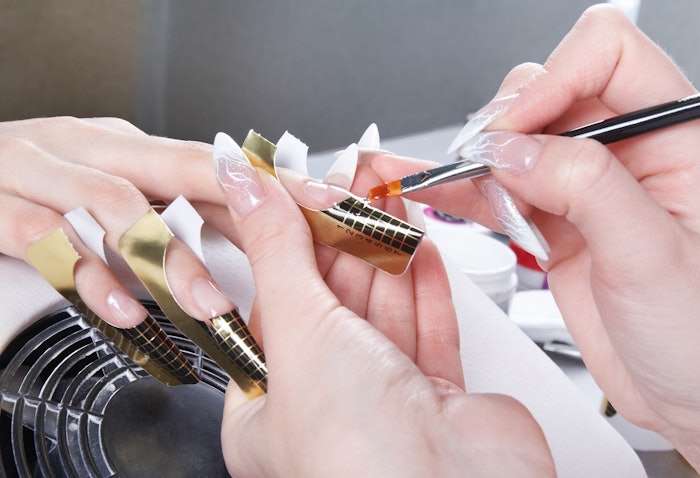
Image Source: google.com
If you're a beginner, don't worry! This simple guide will help you get started and create beautiful acrylic nails in no time.
Grab all Your Material: To begin, make sure you have everything. You'll need acrylic powder, liquid monomer, brushes, nail files, nail tips, a nail lamp, and a nail primer.
Prep Your Nails: Start by cleaning your natural nails and pushing back your cuticles. Use a nail file to shape your nails to your desired length and gently buff the surface to create a smooth base.
Apply Nail Tips: If you want longer nails, you can apply nail tips. Choose the right size for each nail and use nail glue to secure them in place. Trim and shape the tips to match your desired style.
Mix Your Acrylic: In a small dish, mix the acrylic powder and liquid monomer according to the instructions. Use a brush to pick up a small bead of the mixture and place it on the nail, starting near the cuticle.
Sculpt and Shape: Use the brush to shape the acrylic, gently patting and smoothing it over the nail surface. Be patient and work slowly to achieve the desired shape. If needed, dip your brush in monomer to help with the application.
Cure Under a Nail Lamp: Once you've finished shaping the acrylic, place your nails under a nail lamp to cure and harden the acrylic. Follow the instructions on your lamp for the recommended curing time.
File and Buff: After curing, use a nail file to refine the shape of your nails. Gently file the edges and surfaces to smooth out any rough spots. Finish by buffing the nails to create a polished look.
Apply Top Coat: To seal and protect your acrylic nails, apply a thin layer of top coat. This will add shine and durability to your nails, giving them a professional finish.
10 Tips for Crafting the Perfect Acrylic Nail Tutorial for Step by Step
Follow these 10 simple tips to ensure your tutorial is informative, easy to understand, and the best acrylic nails tutorial out there!
1. Plan Ahead: Before you start filming, make a list of the steps you'll cover in your tutorial. This can help you keep organized and avoid overlooking crucial details.
2. Gather Your Supplies: Make sure you have all the necessary supplies within reach. This includes acrylic powder, liquid, brushes, nail files, and any other tools you'll be using.
3. Clear Workspace: Set up a clean and clutter-free workspace. This will make it easier for your viewers to see what you're doing and follow along.
4. Proper Lighting: Good lighting is essential for a clear and well-lit tutorial. Position your filming area near a window or use bright, natural lighting to ensure your nails are visible.
5. Speak Clearly: Speak slowly and clearly throughout the tutorial. Use simple language and explain each step in a way that anyone can understand.
6. Show Close-ups: When demonstrating each step, make sure to show close-up shots of your nails. This will help viewers see the details and replicate the technique accurately.
7. Demonstrate Techniques: Take your time to demonstrate each technique thoroughly. Show how to apply the acrylic, shape the nails, and file them for a smooth finish.
8. Use Visual Cues: Consider using arrows or text overlays in your video to highlight important areas or steps. This will help viewers focus on the key aspects of the tutorial.
9. Provide Tips and Troubleshooting: Share helpful tips and tricks along the way. Address common mistakes or challenges that viewers may encounter and provide solutions or alternatives.
10. Edit and Review: After filming, take the time to edit your video. Remove any unnecessary footage and ensure the tutorial flows smoothly. Watch it back to make sure everything is clear and easy to follow.
Of all nail nail tutorials acrylic nails are the most popular these days. If you are just getting into creating nail tutorials acrylic nails therefore are a great place to begin.
Related Article: Spring Nail Trends Are About to be Everywhere in 2023
By following these tips, you'll be well on your way to creating a fantastic tutorial acrylic nails that will help others learn and perfect their nail art skills. Happy filming!
Written by- Ananya Majumdar