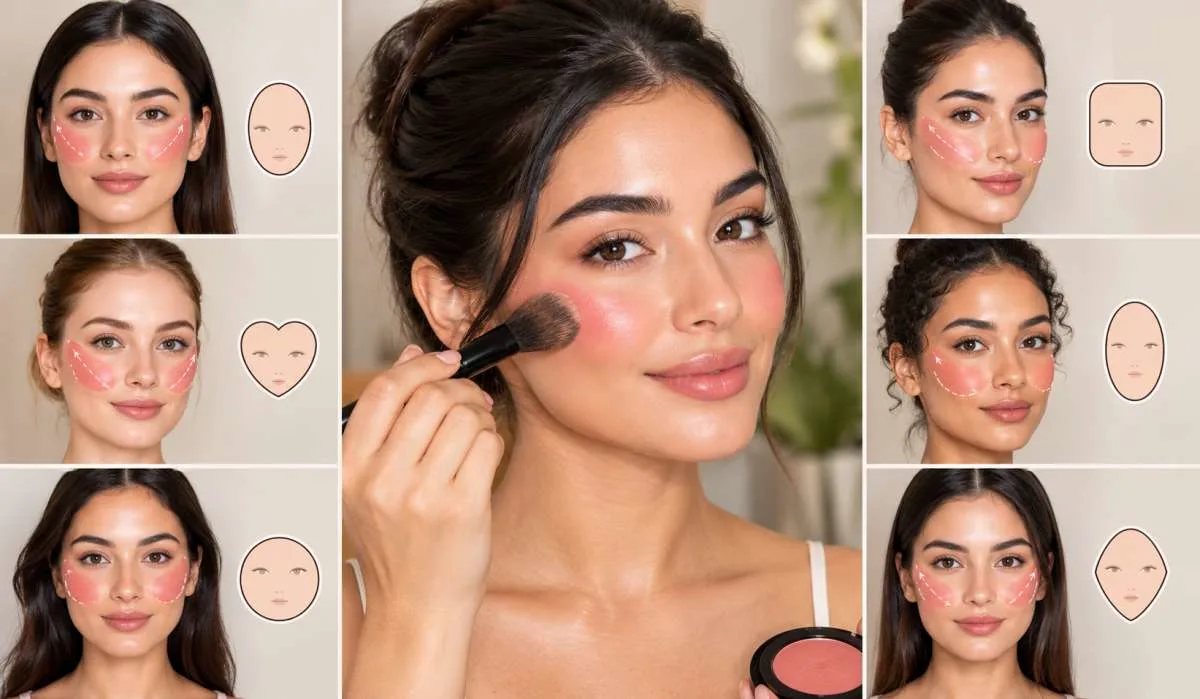
Blush placement changes everything. Same blush,brush but different spot. One placement makes your face look lifted. Another makes it look wider. A third makes you look like you have a fever. Most people learn one way and use it on every face.
That is the mistake. Your face shape decides where the blush goes. Not a tutorial from someone with different bone structure. I learned this late. Used to put blush on the apples because magazines said so. Then a makeup artist moved it an inch. Same blush, Slimmer face. So here is how to apply blush according to face shape. Simple No contouring.
First, Find Your Face Shape
Stand in front of a mirror. Pull your hair back. Look straight.
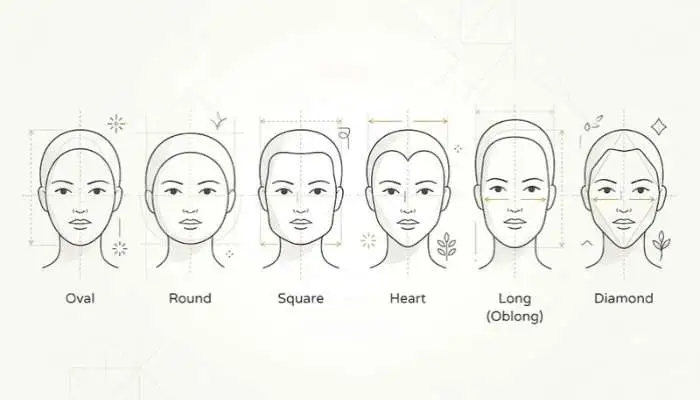
- Oval. Forehead slightly wider than jaw. Cheekbones are the widest part. Face is longer than wide. Balanced.
- Round. Width and length are almost equal. Full cheeks. Soft jaw. No sharp angles.
- Square. Forehead, cheekbones, and jaw are all similar width. Strong jawline. Sharp angles.
- Heart. Wide forehead. Narrow chin. Cheekbones wide. Jaw tapers down.
- Long. Face is clearly longer than wide. Forehead and jaw similar width. Narrow.
- Diamond. Forehead and jaw narrow. Cheekbones are the widest part. Pointed chin.
If you are between two shapes, that is normal. Most people are. Pick the closest one. The rules overlap anyway.
Read More: How to Stop Concealer from Creasing: Makeup Tips That Work
How to Apply Blush According to Face Shape?
Oval Face
You have the easiest face shape. Most placements work.
- Where. On the cheekbones. Slightly up and out. Toward the temple.
- How. Smile. Find the cheekbone. Apply blush starting from the apple, blending up toward the temple. Stop before you reach the hairline.
- Why. This follows your natural bone structure. It lifts the face. Keeps it balanced.
Do not put blush too low. Below the cheekbone drags the face down. Even on an oval face.
Round Face
The goal here is to add angles. Not width.
- Where. Higher up. Along the cheekbone. Angled toward the temple. Not on the apples.
- How. Suck your cheeks in slightly. Find the hollow. Apply blush just above that hollow. Blend upward and outward toward the ear. Keep it high.
- Why. Horizontal placement widens a round face. Diagonal placement adds length. That is the whole trick.
Skip the apples of the cheeks. That is the mistake. Blush on the apples makes a round face look rounder.
Square Face
You have strong angles. The goal is to soften them.
- Where. On the apples. Rounded placement. Not diagonal.
- How. Smile. Apply blush in a circular motion on the apples. Blend outward but keep the shape round. Do not angle it up sharply.
- Why. Round placement softens a strong jaw. Diagonal placement makes a square face look harder. Round is the answer here.
Also apply a small amount on the jawline. Softens the sharp corners.
Heart Face
Wide forehead, narrow chin. The goal is balance.
- Where. On the cheekbones. Slightly lower than usual. Blended outward, not up.
- How. Apply on the cheekbone. Blend toward the ear. Keep it horizontal. Not diagonal. Add a tiny amount on the chin. Yes, the chin. It balances the narrow lower face.
- Why. Horizontal placement balances the wide forehead. Blush on the chin fills out the lower face. Small amount only.
Skip blush high on the cheekbones. It makes the forehead look wider.
Long Face
The goal is to shorten. Not lengthen.
- Where. On the apples. Horizontal placement. Across the face, not up.
- How. Apply blush on the apples. Blend straight outward toward the ears. Keep it flat. Not diagonal.
- Why. Diagonal placement adds length. Horizontal placement cuts the face visually. That is what you want.
- You can also apply a small amount across the bridge of the nose. It breaks the length. Looks natural too.
Diamond Face
Wide cheekbones, narrow forehead and chin. The goal is to soften the cheekbones.
- Where. On the cheekbones. But blended inward and downward. Not up.
- How. Apply on the widest part of the cheekbone. Blend toward the nose and slightly down. Not toward the temple.
- Why. Blending up emphasises the width. Blending down softens it. Small amount only.
How to Apply Blush for a Natural Look?
Natural blush is not about the colour. It is about the placement and the amount.
- Placement. Wherever your face shape needs. But higher than you think. Natural flush sits high on the cheek.
- Amount. Less than you think. Two taps of the brush. That is enough for one cheek. You can always add. You cannot remove easily.
- Blend. Blend until you cannot see where the blush starts or ends. No edges.
- Colour. Match your natural flush. Pinch your cheek. Whatever colour that is, that is your shade.
- Finish. Cream blush looks more natural than powder. It melts into the skin. No visible powder texture.
- Light. Apply near a window. Bathroom light makes blush look softer than it is. You walk out looking like a tomato.
- The pinch test. Apply. Then pinch your cheek. If the blush does not blend with the flush, it is too much or the wrong shade.
One more thing. Natural blush goes on the cheekbone, not under it. Under is contouring. That is a different thing.
You May Also Read: Best Eyelash Curler for Short, Straight and Hooded Lashes
How to Apply Blush on Oval Face Step by Step?
Oval face is the most common. So here it is in detail.
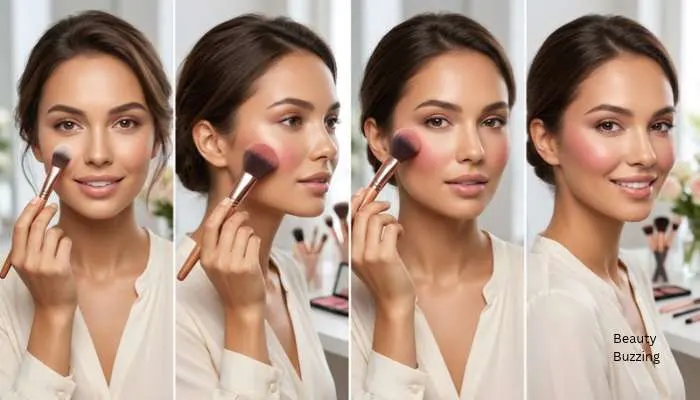
- Step 1. Start with foundation and powder. Blush goes on top. Not under.
- Step 2. Smile. Find the cheekbone. Not the apple. The bone.
- Step 3. Load the brush. Tap off the excess. Two taps.
- Step 4. Start at the apple. Small circular motion.
- Step 5. Blend up toward the temple. Short strokes. Follow the bone.
- Step 6. Stop before the hairline. One finger space gap.
- Step 7. Check in daylight. Add more only if needed.
- Step 8. Blend the edges with a clean brush. No visible lines.
That is the full method. Four minutes. Works for oval. For other shapes, change step five. That is the only difference. The direction changes. Everything else stays.
How to Apply Blush with Fingers?
Fingers are better than a brush for cream blush. The warmth melts the product. It blends into the skin better.
How?
- Dot the cream blush on the cheekbone. Two dots. Not one big blob.
- Tap. Do not rub. Tap with two fingers. Small taps. Move outward.
- Stop when the edges disappear.
- Wash your hands after. Obvious but people forget.
Why fingers work. You can feel the pressure. You cannot press too hard without noticing. A brush has no feedback. Fingers do.
One rule. Use two fingers, not one. One finger presses too hard and leaves a patch. Two fingers spread the pressure. Try it. You will feel the difference.
For powder blush, use a brush. Fingers do not work well with powder. The oils in your skin make it patchy.
How to Apply Blush and Highlighter?
These two work together. But in different places. Do not mix them.
- Order. Blush first. Highlighter second. Always. Highlighter on top of blush looks better. The other way round gets muddy.
- Blush placement. As per your face shape. Cheekbone.
- Highlighter placement. On the top of the cheekbone. Slightly above the blush. Not on the same spot. Above it.
- Also highlight. Bridge of the nose. Cupid's bow. Brow bone. Inner corner of the eye. Small amounts.
- Not on. The whole cheek. The forehead centre. The chin. Too much highlighter looks greasy.
- Rule. Blush adds colour. Highlighter adds light. They do different jobs. Keep them separate. One on the bone. One above the bone.
- Blend. Blend the edges where blush meets highlighter. But do not mix them into one product. You want to see both.
How to Apply Blush to Round Face?
This is the most asked one. So here it is in detail.
- Step 1. Foundation and powder first.
- Step 2. Suck your cheeks in. Find the hollow under the cheekbone.
- Step 3. Apply blush just above that hollow. Not in it. Above it.
- Step 4. Blend up and out. Toward the top of the ear. Diagonal. Not horizontal.
- Step 5. Keep it high. Closer to the eye than the mouth.
- Step 6. Blend the lower edge well. No hard line under the blush.
- Step 7. Add a tiny bit on the jawline if you want. Softens the roundness.
- Step 8. Check in daylight. The angle matters more than the amount.
Two mistakes to avoid. Blush on the apples. Blush too low. Both make a round face look rounder.
Common Mistakes
- Blush too low. Drags the face down. High placement lifts.
- Too much product. Tap the brush. Always. Build slowly.
- Not blending the edges. Visible lines look like war paint. Blend until invisible.
- Wrong colour. Too bright looks like a fever. Too dull looks like dirt. Match your natural flush.
- Powder blush on dry skin. Looks patchy. Use cream on dry skin.
- Blush on top of unset foundation. It slides. Powder first. Then blush.
- Ignoring the light. Bathroom light lies. Check near a window.
- Same placement for every face shape. The whole point of this article. Change the direction. Change the look.
Quick Table
| Face shape | Where to place | Direction |
|---|---|---|
| Oval | Cheekbone | Up toward temple |
| Round | Above the hollow | Diagonally up and out |
| Square | Apples | Circular, outward |
| Heart | Cheekbone | Horizontal, plus chin |
| Long | Apples | Horizontal, across face |
| Diamond | Widest cheekbone | Inward and down |
Last Thing
Your face shape decides the placement not a trend. Not a tutorial from someone with different bone structure. So learn how to apply blush according to face shape once. Then practice it ten times. Round faces, diagonal and high. Square faces, round on the apples. Long faces, horizontal across.
That is the whole system Check in daylight, always bathroom light has fooled everyone at least once and start with less product than you think two taps of the brush. You can always add. You cannot remove easily. Simple placement right direction done.
FAQs
1. Where to apply blush on round face?
Above the hollow. Diagonal, up toward ear not on apples.
2. Best blush for Indian skin?
Peach, coral, warm pink. Deep berry for night. Skip cool pinks.
3. Can I use fingers for blush?
Cream, yes. Two fingers, tap don't rub. Powder, use brush.
4. Blush before or after powder?
After Set base first Otherwise it slides.
5. Why does blush look patchy?
Dry skin Or too much product Or no powder base.
6. Blush and highlighter order?
Blush first, Highlighter above it not same spot.
7. How to make blush last all day?
Cream first. Powder on top same shade layers hold.