
The power of makeup is undeniable; Our favorite products help us create the beauty looks we love, highlight our favorite features and embody our individual definitions of beauty. The best makeup routines help the modern woman boost her self-esteem and face the world head-on, no matter what the day brings.
If so, what's the problem? When you have come to right place and right time to makeup your face and skillful application can make all the difference. Correctly applying your favorite products and applying the right amount of makeup can do two things: get the look you want and make the most of your makeup.
In this article, you are searching for the best and natural makeup tutorial that keeps your skin glowing everyday. Learn how to apply makeup with these essential beauty tips. From applying liquid foundation to using gel eyeliner, this list of steps and makeup tips will help you create a flawless look you can be proud of.
What Is It? The Correct Order of the Makeup Tutorial?
We know you've seen countless makeup tutorials online, you've seen your favorite stars apply makeup with your favorite cosmetics, and maybe you've even seen them create your own must-have. next to them. But there are never enough helpful tools and guides to help you on your makeup journey!
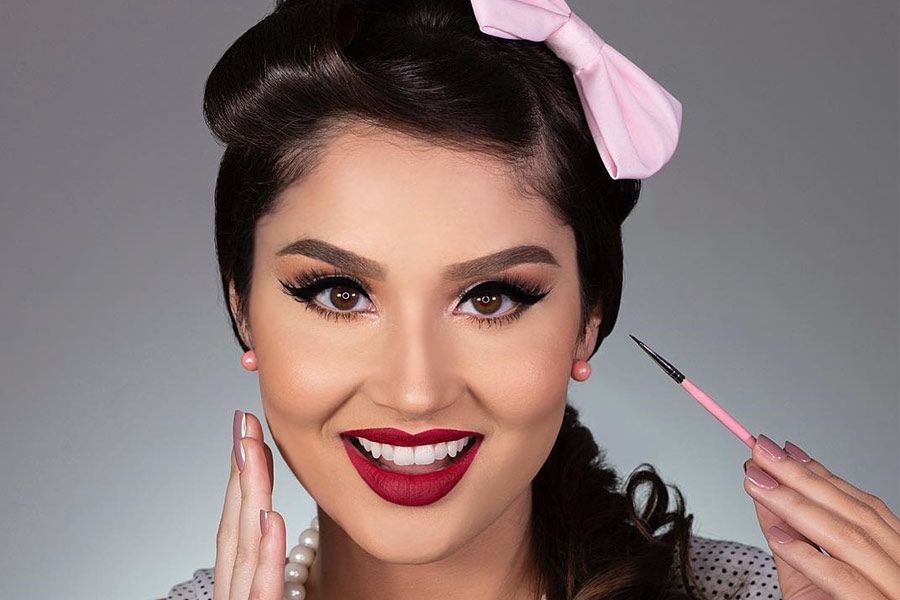
Image Source: google.com
This is where we come in with our guide that will give you the steps to follow to apply makeup explained. Before I walk you through the 4-1-1 steps for applying makeup, we want you to know that there really is no correct order set in stone. When it comes to following the makeup steps in the correct order, you need to remember to do what's best for your skill level, your skin, and the overall look you want.
Although there are many ways to apply makeup and many different steps to follow, we have created a plan for you that can help you look fresh and beautiful every time to achieve a look. Let this step-by-step guide give you a foundation (see what we did there?) for applying makeup. And let me help you feel more comfortable with everything from applying a mineral foundation that can cover rosacea to properly applying a tinted balm and finishing with a setting spray.
We hope this guide helps you feel more confident in your skin and gets you closer to the makeup style you're looking for. So read on to learn more about our step-by-step makeup guide and start creating a makeup masterpiece.
When it comes to successfully applying makeup that lasts and looks amazing, applying foundation should always be the first step. Primer helps prep your skin, fills in fine lines and wrinkles, creates a clear makeup palette, and provides a better base so your makeup lasts as long as possible.
Beautybuzzing offers a variety of primer options, including brightening and mattifying primers, to prep your face with one of these bases. prepare nearby. Colorescience mineral-based makeup is gentle on the skin and contains no chemicals.
Steps for Applying Makeup
As mentioned above, there is no single method for applying makeup and there are no set steps for makeup. However, we can break down the steps that work for us here on the Colorescience team. We took the time to make sure this order of makeup application steps makes the most sense and can help you achieve amazing makeup!
Okay, ready to decide. Let's get started.
Step 1: Moisturizer
Before you start applying makeup, take the time to prep your skin with a quality moisturizer. Choosing the right moisturizer is a crucial part of the puzzle.
Face Sprays - These are water-based solutions that contain certain substances that it may contain. for the skin. Improved vitamins and fragrances. Facial sprays are not designed to restore moisture to your skin, but they can be helpful in maintaining a dewy appearance throughout the day. Simply spray it during the day when your skin is dry.
Serums: This is a lightweight solution that is easily absorbed by the skin. There are a wide variety of serums tailored to specific problem areas. Some serums help hydrate the skin to prevent wrinkles, while others contain ingredients that can brighten a dull complexion.

Image Source: google.com
Lotions: Lotions are the most commonly used moisturizers. used. hydrating. can benefit a variety of skin types. Opt for lotions labeled "non-comedogenic." These products are designed to prevent clogged pores.
Creams: If your dry skin needs extra help, it may be time to "invest in a moisturizer." This is an increasingly thick solution that can hydrate overly dry skin. Day creams can be used as a base for makeup, but night creams are designed to give your skin an extra dose of hydration while you sleep. Apply before bed and in the morning you will be greeted by soft, supple skin.
Oils: If you need more hydration, think about oils. Some oils may be a good option for people with dry, sensitive or normal skin. However, if you suffer from acne or have difficulty using cosmetics specifically for oily skin, avoid oil-based moisturizers.
Learning to apply moisturizer correctly is half the battle. Pour a small amount onto your fingers. The spoon should be about the size of a quarter. First, apply moisturizer to your forehead. Start in the center of your face and then move outward and upward. Then do the same, starting with your nose and spreading the moisturizer across your cheeks. Make sure to apply moisturizer evenly to your skin to avoid clogging your pores. After applying enough moisturizer, rub gently in a circular motion and let dry for a few minutes before moving on to the next step.
Step 2 Primer:
Now that your skin is well hydrated, prepare your face with a primer. Whether you're applying a light layer of foundation or going for a full face of makeup, primer is an important first step. Using a primer under your makeup will help your look last longer.
What exactly is a primer? Consider primer as a base for foundation or face makeup, ensuring it goes on smoother and lasts longer. Primers are silky gels and creams that fill facial wrinkles and pores, smooth uneven textures, and create the ideal base for makeup.
Use to apply Get started applying a small amount of primer to your fingertips or your favorite makeup brush or sponge. Pro tip: A little goes a long way. Start with a small amount of primer in the center of your face and slowly spread it towards your cheeks, forehead and chin.
When to apply it If you have a primer on delicate skin around the eyelids (and apply a professional-looking smoky eye throughout the day), be sure to find a product designed specifically for this area of the face. Our eyelids can accumulate oil throughout the day, making eyeshadow look "creased." If you have oily eyelids and apply eyeshadow or eyeliner without primer, the application may be patchy and uneven.
Step 3: Liquid Foundation
When it comes to foundation, finding the perfect shade for your skin is a priority. The right shade of foundation can make the difference. So how do you choose? Test the foundation colors on your chin. If the foundation disappears after application without blending, you have found your true foundation. It may take some trial and error, but taking the time to choose the right shade is key.
Once you choose a product, think about what tools you'll have hand. your disposition. use to apply it. Some women prefer to use their fingers, while others opt for beauty tools like brushes and sponges. If you prefer a look with light coverage, your fingers might be the right applicator. However, never touch your face without washing your hands thoroughly and be sure to wash them after use; You don't want to find traces of makeup all over your house. For a more involved look, opt for an applicator brush or a beauty blender.
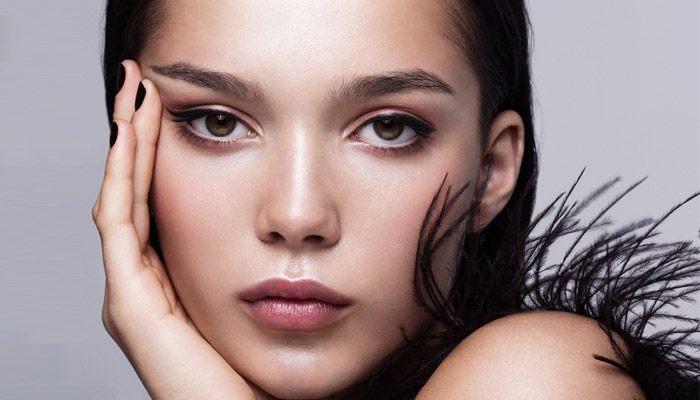
Image Source: google.com
Start from the center of the face and spread the liquid foundation outwards. When you apply foundation to your skin, be sure to buff it. Some women like to apply a damp sponge to their foundation to ensure it penetrates fine lines and wrinkles, thus creating a smoother, more even texture. Some types of makeup brushes are also great for applying foundation to the skin.
Step 4: Concealer
Liquid concealer is ideal when you want light coverage over a large area of the face. Liquid concealer also works well for those who want a lightweight finish, especially in areas with wrinkles, such as around the eyes and mouth.
Concealer sticks and Compact correctors are a good option. -Suitable for more intense coverage of smaller, specific areas of the face.
Choose the Color of the Concealer
We recommend investing in two colors of concealer. One of them should match your skin tone and can be used to cover dark spots, pimples and other facial blemishes. The other should be lighter than your skin tone and can be used to highlight certain areas of the face or add clarity to makeup.
Read Also: The Beauty of Romand Lip Tint: A Guide to Enhancing Your Look
Note: Some women prefer apply concealer before liquid foundation. The order of these two steps is really a matter of preference, trial and error. Try them both and find out which method works best to achieve a smooth, glowing finish on your skin. The Colorescience Finishing Touch Protocol product line offers everything you need to complete your look! However, if you only use powder foundation, always apply concealer first.
Step 5: Foundation Power
Applying powder foundation can be a complicated process; too little and you may have skipped the step altogether; Too much and you'll get the dreaded "cake look." In your quest for flawless skin, you've probably heard a lot of advice about powder foundations. Follow these tips to achieve the perfect complexion.
Use a large, fluffy powder brush and start by applying a light layer of powder to your face. Press the hairs into the powder, then move them across the skin in long, arcing motions.
If there are certain areas of the skin that need more coverage (red If the areas Facial oils tend to be in the center, you can apply a little more powder. For this step, dip the brush in the powder and press it firmly into the skin; this step allows the powder to close the pores and create lines and thus obtain a smoother texture.
Step 6: Blush
Tapered cheeks have been a glamorous makeup element for centuries. If you want to add a little more color and vibrancy to your complexion, blush might be the key. To apply blush, use a dense brush with many bristles. Here's how to make sure you get the most out of every blush.
Pink blush: If you use pink blush, apply it only to the apples of your cheeks. Pink blush is meant to mimic the natural redness produced by the body, which causes blood to pool in the cheeks. To restore your cheekbones, use your most beautiful smile. The “apple” refers to the front of your cheek, which becomes more prominent when you smile.
Peach Blush: Instead of using pink blush only on your cheeks, use these shades to sculpt your face and add a little color. Turn one side of your face (as if you were pursing your lips and pointing them towards the opposite side of your face). Then, apply peach blush along your cheekbones, starting near your ears and ending at your cheekbones.
Step 7: Eyeshadow
Eyeshadows can add interest to your makeup, whether you choose neutral tones or go bold with colorful tones. Whatevr style you use, choose two complementary eyeshadows: a lighter shade and a darker shade.
Dip the eyeshadow brush into the light shade and press the brush to remove it. excess product. Apply the lighter eyeshadow all over the eyelid, starting at the lash line and ending just above the crease.
Now dip the brush into the darker color. surplus has been achieved again. Apply the color to the outer corner of the eye, just above the lash line. Apply the darkest color to the crease, just below the eyebrow. Stop applying it to the center of your eyelid, because you don't want to darken the inner corner of your eyes. Take a clean eyeshadow brush and blend the two shades. If you want a deeper look, reapply the darker shade.
Step 8: Highlighter
The right highlighter gives every make-up a touch of glamor and shine. Whether you're going for a more natural look or something bold and pretty, highlighters can complement your makeup application.
Highlighters come in different forms , including liquids and creams. and dust. You can use one or find your favorite combination of two or three. Whatever your choice, the registration process remains the same.
Step 12: Lip Gloss
Before applying gloss, prepare your lips. If your lips are chapped and chapped, use a gentle scrub to remove dead skin and apply a protective lip gloss. Then, apply a lip balm or moisturizer to make your lips even softer. Once the lip balm is absorbed, wipe off the excess.

Image Source: google.com
Begin applying the lip gloss to the center of your lips and slide the applicator across your pout. . Avoid placing the gloss above the natural lip line and dab your lips lightly to ensure the gloss reaches all corners of the lips.
Step 13: Setting Spray & Setting Power
A setting spray or setting powder can add the finishing touch to your makeup routine. If you want makeup that lasts all day, without oil, wrinkles or shine, it's important to invest in a quality setting solution.
Setting sprays are designed to serve everyone. skin types, it can be used for a variety of looks, whether you prefer light coverage or gorgeous full-face makeup. The setting spray keeps your makeup in place, so you will have to reapply it less and your makeup will stay perfect for hours.
The setting spray is applied to the face like a hair spray. It matches your style and applies in a very similar way. Hold the bottle at least 20cm away from your face and spray lightly several times to ensure all parts of your face are covered. If you want to make sure your makeup covers from your forehead to your chin, spray it on your face first in an X shape and then in a T shape.